

Canon Eos 600d Video Test 1080p
Solusi
With your photographic camera, yous can shoot photos while viewing the epitome on the camera'due south LCD monitor. This is called "Alive View shooting."
This page describes how to change the focus mode for Live View shooting. For details on how to perform piece of cake Live View shooting in default settings, delight refer to the related data.
Please note that some shooting procedures differ between nonetheless photos and movies. To shoot still photos, please refer to the instructions for nonetheless photos, and to shoot movies, delight refer to the instructions for movies.
Function I. Preparing for Live View Shooting
1. Plow the photographic camera'southward ability switch to <ON>.
2. Plow the Mode Dial to set the shooting mode.
- To shoot nonetheless photos, you lot tin can select all modes except for Movie shooting fashion.
- To shoot movies, select <
 > (Movie shooting).
To use AF to focus, delight proceed to Part Two. To focus manually, delight proceed to Part Three.
Part 2, and Three depict common procedures for still photos and movies.
Part 2. Selecting the AF Mode
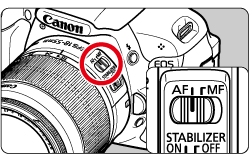
three. Fix the lens focus fashion switch to <AF>.
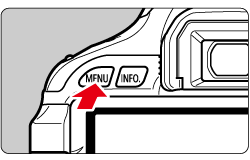
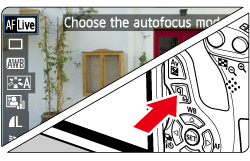
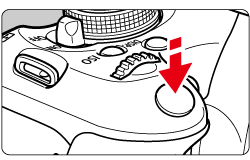
four. Make certain that the camera is ready to have shots, and and then press the <MENU> push.
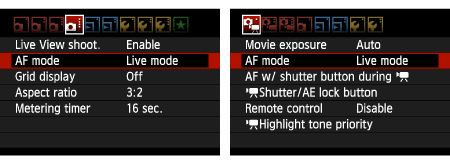
5. Press the <Cross Keys> to select tabs on the MENU screen.
NOTE
If you select [Manual] for the picture show exposure in movie shooting mode, you lot tin ready your own values for ISO speed, shutter speed, and aperture. For more information, please refer to the instruction manuals that came with your photographic camera.

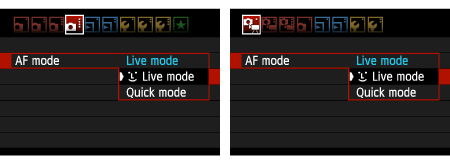
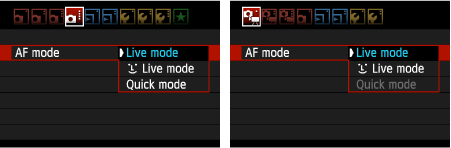
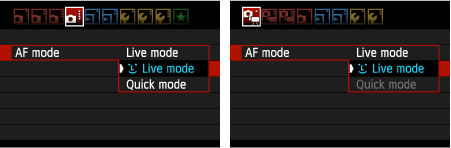
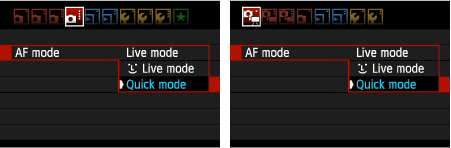
6. Select the [AF way], and then press the <SET> button.
7. Select the AF mode, and then printing the <Set> push button.
Notation
While the paradigm is displayed on the LCD monitor, pressing the <  > button volition enable yous to gear up the AF style etc. on the Quick Control Screen.
For more than information, please refer to the didactics manuals that came with your camera.
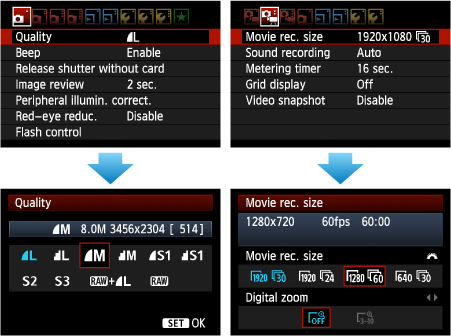
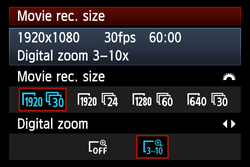
8. Select the image-recording quality for still images or the motion picture-recording size for movies.
For more than information nigh the image quality of all the same images and the recording size of movies, please refer to the instruction manuals that came with your camera.
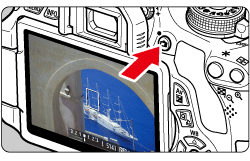
9. To shoot yet photos, press the <  > (Live View shooting/Movie shooting) button, or to shoot movies, press the <Carte du jour> button, so close the menu window. An image will announced on the LCD monitor.
Please go along to Part II ane to 3 depending on the AF way setting.
Part II-1 Using AF (Live Manner) to Focus
When [Live mode] (  ) is set:
The image sensor is used to focus. Although AF is possible with the Live View image displayed, the AF operation will have longer than with Quick mode. Likewise, achieving focus may exist more than difficult than with Quick mode.
[Live way] is ready by default.
Notation
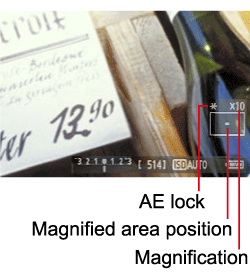
When the image size is set to [1920x1080] (Total HD), you can shoot with an approx. 3x to 10x digital zoom.
- Focusing is done in [Alive mode] or in [
 (Face up detection) Live Mode].
 - For more than information about the [Digital zoom], delight refer to the instruction manuals that came with yur photographic camera.
10. Move the AF point.
- Press the <Cross Keys> to motility the AF point to where you want to focus (information technology cannot go to the edges of the picture).
- To return the AF point to the heart, press the <SET> button or <
 > button.
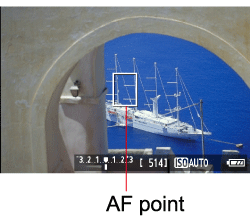
11. Aim the AF point over the subject and press the shutter button halfway.
- When focus is accomplished, the AF point will plow green and the beeper volition sound.
- If focus is not achieved, the AF betoken will turn orangish.
Please proceed to Office IV.
Role II-2. Using AF (Face detection Alive Style) to Focus
When [ (Face Detection) Alive fashion] is set:
With the same AF method as the Live mode, homo faces are detected and focused. Have the target person face up the photographic camera.
10. When you press the < > push, the Quick Command screen will appear. The settable functions will be highlighted in blue.
With the <  > (Cross Keys), select [
  ] ( (Face up detection) Live Manner) as shown in the image below.
Note that the Quick Command bill of fare display volition disappear a few seconds after an particular has been selected.

11. Focus the target face.
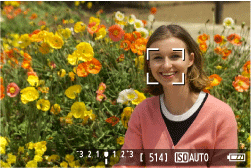
12. Printing the shutter push button halfway and the camera volition focus the face covered by the [  ] frame.
- When focus is achieved, the AF signal will plow light-green and the beeper volition sound.
- If focus is not achieved, the AF point will plough orange.
- If a face cannot be detected, the AF point [
 ] will exist displayed and AF will be executed at the center.
Circumspection
Notes when shooting in [ (Confront detection) Alive Fashion]
- If the focus is way off, face detection will not be possible. If the lens enables manual focusing even while the lens focus mode switch is set to <AF>, turn the focusing ring to attain rough focus. The face up will so be detected and [ ] will be displayed.
- Face detection volition not piece of work if the face is very minor or large in the picture, besides vivid or likewise dark, titled horizontally or diagonally, or partially hidden.
Please continue to Part Iv.
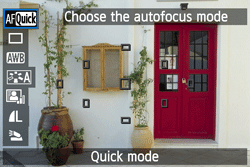
Part Ii-three. Using AF (Quick Mode) to Focus
When [Quick manner](  ) is set:
The dedicated AF sensor is used to focus in the aforementioned way as with viewfinder shooting. Although y'all can focus the desired area chop-chop, the Live View image will be interrupted momentarily during the AF functioning.
Annotation
- When the movie recording size is [1920×1080 30fps] or when the movie recording size is [1920×1080 24fps] and the [Digital zoom] is set, [Quick mode] cannot be selected. Focusing is done in [Live mode] or in [ (Face detection) Alive mode].
- If the AF mode is [Quick way] and the [Digital zoom] is gear up, the AF style will automatically switch to [Live mode].
- For more information about the [Digital zoom], please refer to the instruction manuals that came with your camera.
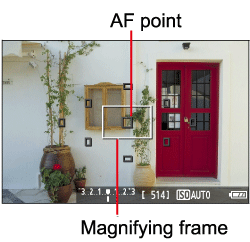
10. The modest boxes on the screen are the AF points, and the larger box is the magnifying frame.
xi. When y'all press the < > push button, the Quick Control screen will appear. The settable functions will be highlighted in blue.
Press the < >(Cross Keys) to select [  ] (Quick mode).
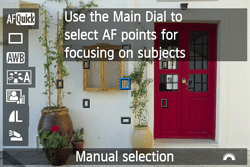
12. Select the AF betoken. Press the <  > (Cross Keys) to make the AF bespeak selectable. Plow the <Master Dial> to select the AF indicate.
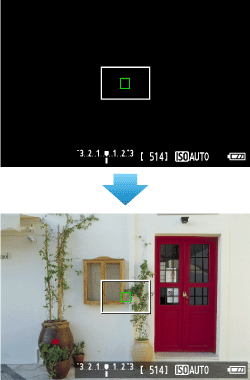
xiii. Aim the AF point over the subject and press the shutter button halfway.(Continue the shutter pressed.)
14. The Alive View image will turn off, the reflex mirror will become back downward, and AF will be executed.
- When focus is achieved, the beeper will audio and the Alive View paradigm will reappear.
- The AF betoken used to focus will low-cal in green.
Delight proceed to Part 4.
Part III. Focusing Manually
Y'all tin can magnify the paradigm and focus precisely manually.
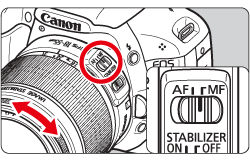
3. Once you lot accept proceeded upwardly to Step 2 of Office I, set the lens focus style switch to <MF>.
4. To shoot however photos, brand sure that the photographic camera is ready to take shots, and then press the < >(Live View shooting) push button. To shoot movies, set up the Mode Punch to < >.
five. The Alive View prototype will announced on the LCD monitor.
Turn the lens focusing ring to focus roughly.
half-dozen. Press the <Cross Keys> to move the magnifying frame to the position where you lot want to focus.
To render the AF point to the center, press the <Ready> push or < > button.
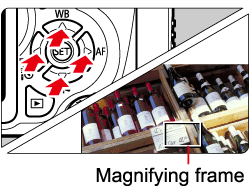
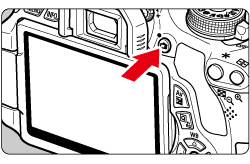
7. Press the <  > (Magnifying) button to magnify the area within the frame.

Each time you press the < > button, the display format will change as follows:
Normal view -> Approx. 5x -> Approx. 10x -> Normal view
Annotation
When the digital zoom is fix, press the < > button or the <  > button while holding downward the <DISP.> button to zoom in or out.
viii. While looking at the Live View image on the LCD monitor, plow the focusing ring to focus manually.
9. After achieving focus, press the < > (Magnifying) push to check the image composition in normal view.
Function Iv. Shooting
Afterward focus is achieved past following the instructions in Part Ii-III, start shooting.
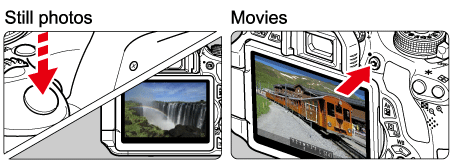
To shoot all the same photos, press the shutter button completely.
- The picture show will be taken and the captured paradigm is displayed on the LCD monitor.
- Afterwards the image review ends, the photographic camera will return to Alive View shooting automatically.
To shoot movies, press < >.
General Note for Alive View Shooting
Delight be aware of the post-obit notes for Live View shooting.
Circumspection
Notes About the Alive View Paradigm
- Nether low or bright light conditions, the Live View image might non reflect the brightness of the captured image.
- If the light source within the image changes, the screen might flicker. If this happens, finish and resume the Alive View shooting under the bodily lite source to be used.
- If you bespeak the camera in a different direction, information technology might throw off the Live View image's right effulgence momentarily. Wait until the brightness level stabilizes before shooting.
White [  ] and Carmine [
  ] Internal Temperature Warning Icons
Live Mode and (Confront Detection) Live Fashion Notes
- Focusing will take slightly longer.
- Even when focus has been achieved, pressing the shutter button halfway volition focus once again.
- The image brightness may change during and afterwards the AF functioning.
- If the light source changes while the Live View image is displayed, the screen might flicker and focusing tin be hard. If this happens, stop the Alive View shooting and autofocus under the actual lite source beginning.
NOTE
When shooting with the photographic camera continued to a TV
If you shoot in Live View with the photographic camera connected to a TV, you tin can use the TV screen as the LCD monitor. This is convenient when you lot desire to enlarge what you want to shoot to check the details. All the same, when connecting the camera to the TV with an HDMI cable, please be aware of the following points.
- When the camera is connected to a Television via HDMI cablevision, the photographic camera will read the data on the Goggle box set's compatible video input signals. The camera then selects the optimum video output signal (1080/60i, 1080/50i, 480/60p, or 576/50p) and the video is displayed.
- When you are non shooting, the camera outputs the video at the ratio displayed on the LCD monitor as is, so information technology is not possible to use the whole screen for a xvi:9 display.
- When movie shooting starts, the video betoken will automatically switch to 480/60p or 576/50p due to the imaging engine'due south compatible limits, resulting in a smaller image size (the size will vary according to the size of the TV screen). Withal, many Hd Television sets volition automatically try and fit the image to sixteen:9, so it will look unnatural with the image stretched horizontally.
- If you connect the camera to a Television and shoot a motion picture, the TV will not output any sound during the shooting. Withal, the sound will be properly recorded.
For more information on how to connect a camera to a Television set, please refer to the educational activity manuals that came with your camera.

Canon Eos 600d Video Test 1080p,
Source: https://id.canon/id/support/8201025700
Posted by: kingmempity1975.blogspot.com
0 Response to "Canon Eos 600d Video Test 1080p"
Post a Comment